It can happen to anyone out on the trail: one false step, one wrong turn and you may find yourself out in the middle of the woods with only the clothes on your back and your wits to get you through. The chances of spending an unexpected night or two in the backcountry are not as slim as you think and the consequences can be dire. Try to stay calm, this is your guide to survival in the Blue Ridge.
Sandi Bird was beginning to worry. What was supposed to be a short day hike was turning into a nightmare she was not prepared for. It was a pleasant spring day when she set out hiking a section of the Appalachian Trail outside Roanoke, Virginia. Sandi was on a trail leading down from McAfee Knob, one she had never hiked before and fellow hikers were few and far between. The trail was still covered with heavy leaf fall from the past autumn, the spring foliage yet to take hold. As she lifted her eyes from the path in an effort to spot her destination, the Tinker Cliffs in the near distance, something under the leaves caught her foot and sent her reeling down the pitch. It was a bad fall, her ankle twisted enough that it was difficult to put weight on it. She tried to hike out, but as the skies darkened and day turned into night she ran through two sets of flashlight batteries and the slow, limping hike down the mountain became more and more dangerous. She realized she would not be able to make it back to the trailhead; Sandi would have to spend the night in the woods.
Overwhelmed with fatigue and underequipped, Sandi did the only thing she could think to do on an unfamiliar trail: she sat down. With her back against a rock, her butt on the trail, and her legs dangling over the edge of a steep hill, she slept the night in the open, exposed to the elements, injured and alone.
The next morning she awoke cold and stiff, but alive. In the daylight, she was able to slowly and carefully navigate back to the trailhead and get to the emergency room, where she was treated for a severely sprained ankle. A hike that should have only taken an afternoon had turned into a 24-hour affair that could have turned out much worse. Had it been a month earlier or the weather changed dramatically, as is common in the Blue Ridge Mountains, we may be telling a different story about Sandi Bird.
Sandi’s story is a typical one when it comes to survival situations in the Appalachians. She was an experienced hiker, taking a day hike on a well-used trail, relatively close to civilization. Yet, she found herself in a dangerous predicament due to unforeseen circumstances outside of her control.
“You say, ‘OK, well you’re close to home,’ but still it was in a season when there were not that many people around and it was still a long hike back out, several miles out,” she said of the ordeal. “You don’t have to be that far from home, you don’t have to be in the middle of the wilderness to be in a survival situation.”
Following her night on the trail, Sandi sought out training that would enable her to better handle an unexpected night in the backcountry. She eventually landed at Mountain Shepherd Wilderness Survival School in Catawba, Virginia. Former United States Air Force Survival Instructor Reggie Bennett started Mountain Shepherd nine years ago to continue his passion for teaching. At Mountain Shepherd, Bennett takes the basic outline of what he taught Air Force pilots and translates it to the general public – minus the “classified stuff,” – instructing classes around the country and in various environments. His courses are developed around the Air Force’s SERE school lessons – SERE stands for Survive Evade Resist Escape, so the more advanced courses can get fairly intense. He also consults on survival and backcountry gear and equipment for manufacturers trying to cut weight while upping efficiency. Needless to say, Bennett knows his stuff. He says a common misconception about wilderness survival often gets in the way of learning: survival does not have to be difficult.
“I think sometimes the mentality is, ‘Look what I suffered through, and I made it and that makes me great,’” says Dina Bennett, Reggie’s wife.. “It doesn’t need to be hard, it doesn’t need to be difficult to make it through if you know how to do things easily.”
Virtually all survival situations involve either lost or injured day hikers so the chances of being rescued or found in Southern Appalachia are dramatically higher than say, if you were lost in the vast woods of Montana.
“Most survival situations are just three days,” says Bennett. “The majority of them are just 24 hours. The likelihood that any one of us is going to be in a survival situation for more than three days is very rare.”
To handle any crisis as short as a couple hours to as long as three days, Bennett teaches his students seven priorities of survival. This is not only an outline of what to do and how to do it, it is a tool unto itself; a way to cope with escalating catastrophe beyond the standard ‘Rule of Threes’—a person can go three hours without shelter, three days without water, and three weeks without food.
1. POSITIVE MENTAL ATTITUDE
“There is no average emergency.”
Priority number one in any wilderness survival or emergency situation is maintaining a positive mental attitude. This principle is echoed by every survival expert and applies to every predicament you could find yourself in no matter the setting.
“People that do very well in a survival situation are people that realize that there is going to be physical and mental stress applied to them,” said Bennett. “But if you can recognize that stress, that’s the key.”
Positive mental attitude is number one because everything else affects it. For example, having a positive mental attitude will help you stay cool and collected when trying to start a fire in the wind; in turn, having that fire gives you a positive mental boost. Carrying a basic emergency kit is the easiest way to elevate your morale. Just having some equipment goes a long way, but having some knowledge can make the difference between getting out alive and not.
“The more you know, the more that you feel like, “It’s all right, I got this,’” says Jeff Gottlieb, who manages the survival school at SOLO Southeast. “A lot of wilderness survival is feeling like it’s OK to be there. A little bit of comfort in a trying situation can make the difference in a successful attitude and whether you are going to make it.”
2. WILDERNESS FIRST AID
“You are help.”
Every emergency pack should include some version of a first aid kit with the bare essentials: bandaids, bandages, Advil, and disinfectant to treat scrapes, blisters, and bee stings. Other common injuries like twisted ankles and knees, or deep flesh wounds will require professional medical attention that only a Wilderness EMT or First Responder can provide. More important than running for help in a situation like this is assessing the situation so you can inform rescue personnel of the number of people injured, severity, environment, etc.
“You’re help; there isn’t help immediately available,” says SOLO Southeast Director and paramedic Jono Bryant. “Even if you get them on the cell phone, it’s going to take ages for anyone to come and get you. The care is essentially the same [as front country medicine] other than the improvisation, but the environment can change everything. Suddenly that broken ankle has turned into a hypothermia victim.”
The biggest dangers to anyone in the backcountry are the double threats of heat and cold. Either can be deadly if not taken seriously, but the warning signs or hypothermia and heat stroke are easily spotted, if you know what to look for.
Hypothermia
There are two main components of hypothermia: the first is getting cold and wet. This can be easily prevented with the proper clothing. The relatively warm state of Texas has one of the highest rates of hypothermia because people don’t realize you get cold 25 times faster when you’re wet. Never wear cotton in cold weather, opt for polypropylenes or wools, which stay warm even when soaked. The second is fuel or food: you burn twice as many calories in cold weather, so eating food rich in calories and fats will help stave off hypothermia.
“The trouble with hypothermia is that the first thing that is affected is your judgment and you start making poor decisions,” says Bryant. “There are many documented cases of people who were found frozen to death on the side of a mountain and they go into their backpack and they had food, fuel, a stove, a sleeping bag, but they just started making poor decisions. You just have to recognize when someone is entering this stage.”
Recognizing the onset of hypothermia is as easy as keeping an eye out for the “umbles,” says Bryant. It begins with a general discomfort (the grumbles); then the mumbles where speech is slurred; then motor function lapses (the fumbles—if you have difficulty touching your pinky to your thumb); then the stumbles and tumbles; and culminates with the crumbles which is the beginning of the end.
If you see any of these signs, it is time to act. Get the person under jackets or a sleeping bag, and off the cold ground onto a tarp or more jackets. Start a fire immediately. Providing the victim warm liquids and food will help keep the core temperature up.
Heat Stroke
As dangerous as cold is, heat can be equally threatening but not as noticeable in the field. Heat injury begins with dehydration: if you feel thirsty you are already significantly dehydrated and may begin to feel dizzy or nauseated. A hydrated person should be urinating every two hours. Heat exhaustion is the next stage and you will begin to feel lethargic, weak and may be pale and clammy. Heat stroke is characterized by the body being red and flushed or having seizures and can be fatal if not treated. Getting out of the sun and getting some food and water in the victim is essential if any of these symptoms arise. Pour water over their body to cool it, but not to the point of shivering, as this will only generate more heat.
3. SHELTER CRAFT
“You never know what’s coming.”
In the Blue Ridge Mountains the weather can turn at any moment; it may be sunny and 65 one moment and raining and 40 the next. The changes in weather and temperature are especially apparent when day turns to night, when the temperature plummets and wetness seeps in everywhere. Improvised insulation is your only friend when you have nothing, helping to retain the heat you already have. The clothes on your back are the first line of shelter: stuffing dry leaves or other insulation into your jacket and pants provides extra protection against cold. Dry leaves or grasses are great filler. You can get away with damp leaves some of the time, but having a grasp of the physics of insulation is vital if you are out in the winter months.
“Your margin for sloppiness is smaller,” says Gottlieb. “If it’s June and you don’t understand shelter insulation very well, you will probably be fine, but if it’s January and you don’t understand insulation very well, it could be life threatening.”
Having a heavy duty, 55-gallon trash bag in your emergency kit gives you the most bang for your buck of any other piece of equipment. They are large, waterproof, windproof, tough, and can be used as a tent, poncho, and rain collector. String a trash bag between two trees and you have instant protection from the wind and rain that compound the effects of cold—especially wind.
“People don’t understand how insidious that wind is,” says Bennett. He tells a tale of soldiers sitting in a 35-degree cold chamber in their underwear and making it two hours before they couldn’t take it anymore. When they added a mere three-mile per hour wind, the soldiers only lasted 20 minutes.
If you don’t have a trash bag, a suitable shelter can be made by propping up a long log with one end on the ground and one in the crux of a tree, bracing it with stick ribs along its length, and piling dead leaves on top of the shelter and inside it for insulation. It may not sound like much, but this style of shelter is surprisingly adept at keeping rain and wind out. Always build your shelter away from hanging branches or boulders, on a rise so water does not seep under and point the door of the shelter to the east or southeast so the prevailing wind does not blow rain in.
Survival – How to Build a Shelter from Blue Ridge Outdoors on Vimeo.
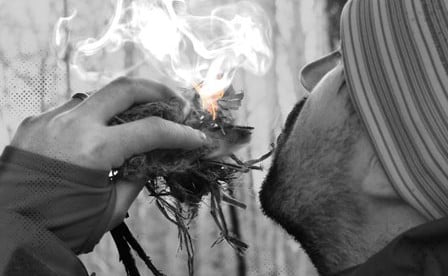
4. FIRE CRAFT
“Fire is life out there.”
When used incorrectly, fire has the power to injure and destroy. When used correctly fire has the ability to warm, light, dry, cook, boil, defend, signal, and otherwise keep you safe in the backcountry.
“Fire is a priority, but fire helps out all the other priorities,” says Bennett. “Fire is life out there.”
A lighter, waterproof matches, or some type of flint and steel should be part of any emergency kit, as should a ‘fire bug’—tinder that can take a spark and light almost instantly. These include products like WetFire, a lightweight cube developed for the military that takes a spark and burns at 1,300 degrees, even when wet. A DIY alternative is to soak cotton balls in Vaseline and store them in a pill bottle. In the wild, tulip poplar fibers or birch bark make the best tinder.
Building a pit will help protect the fire from the elements. Pile rocks around the fire to reflect the heat toward you and then use the heated rocks in your shelter to help you stay warm through the night. Do not put wet stones directly into the fire, however, as they have the potential to explode due to the expanding steam inside the rock.
Building a fire becomes more difficult without a spark, but not impossible if you know what you are doing. A fire by friction using the bow drill technique will produce a flame, but without practice your chances of pulling it off are greatly diminished in a stressful situation. Knowledge and practice are the only things to fall back on when out in the wilderness, so get plenty of both in regards to fire making.
“If you do it right and you have equipment that is up to your standards, it shouldn’t take you more than 30 seconds to have a glowing ember ready to feed into the tinder, and maybe have a flame in one minute,” said Gottlieb. “When your hands are freezing and you have no backup is not the time to learn how to make a fire by friction.”
Survival – How to Start a Fire from Blue Ridge Outdoors on Vimeo.
5. SIGNALING
“Your best chance of survival is getting rescued.”
Signaling for rescue is one of the most important, but often overlooked, priorities for anyone lost in the woods, says Bennett.
“Signaling is being proactive, helping rescuers rescue you,” he said. “Most people are not ready; they are so focused on surviving that they forget that they should be prepared to signal any rescue that comes by.”
Signals can be as easy as tying a bandana to a tree branch or banging a stick against a hollow log. Save your voice by whooping or yipping instead of yelling “help,” and keep in mind the international signal for distress is a series of three – the Morse Code for “S.O.S.” is three dots, three dashes, three dots. Have a stash of flammable debris near the fire so if you hear a helicopter or plane, you can dump the debris on the flame to create a smoke pillar that can be visible for miles.
6. WATER CRAFT
“Walk downhill.”
After protection from the elements, finding potable water is the most vital factor in any survival situation. Humans can only go a few days without water, and you are losing it constantly through your sweat, breath, urine, and other basic functions. Fortunately, this is the Blue Ridge so locating a water source is not usually a problem.
“The East Coast is a water-rich part of the world,” says Earth Connection School founder Tim MacWelch. “Walk downhill for a couple hundred yards and you are either going to see some kind of sign of water or actually see water.”
Water is all around us in the Appalachians, but water in the wild suitable for human consumption is hard, if not impossible, to come by. Rain water and snow are as clean as the air they fall through and surfaces they touch. Drinking untreated water from even the most seemingly pristine mountain stream is still an invitation to an army of bacteria, viruses, parasites, and protozoa, any of which can do you harm. Boiling water for 10 minutes will make it suitable to drink, but lucky for us there is a great water treatment arms race going on currently in the outdoor industry. Fueled by the ultra light hiking movement, companies are bending over backwards to come up with the latest, greatest, lightest water purification treatment system on the market. This means tossing a filter or some chlorine tablets in your pack is much easier than even a couple of years ago.
7. FOOD CRAFT
“Everything is edible once.”
Food is fairly low on the totem pole when it comes to survival since the body can manage without it for weeks if necessary. That being said, a full or even partially full belly will go a long way to maintaining a positive mental attitude. Edible plants and animals are abundant in the Southeast and Mid-Atlantic, but so are poisonous ones, and it can take a lifetime of study to know them all. Hub Knott is the founder and director of the Living Earth School, and says a great way to begin building a knowledge bank of edible wild plants is to start with a fatal flora process of elimination.
“Once you know what harms you in your environment, then you’re pretty safe,” said Knott. “If you try something else, some things aren’t super edible but you know it’s not going to kill you.”
Knowing what to avoid will help you locate the nuts and flowers that won’t make you sick like walnuts, hickories, pawpaws, dandelions, and wood nettles. Wild greens are more nutrient packed and filling than store bought greens so you don’t need as much in one sitting. Opt for water creatures over land creatures; crayfish, frogs, and snails are easier to locate and catch which will cut down on calories burned versus earned. When it comes to the glamorous world of eating insects, there are a few guidelines to follow, although it is not an exact science: six legs and under and only natural colors like blacks, browns, or greens. Use nature against itself by only eating insects that are hidden or want to hide – the evolutionary defense mechanism to hide means they seldom have other defenses like poison or foul taste.
Stay or Go?
When lost or injured in the wilderness, conventional wisdom says it is better to stay where you are and hunker down to await rescue. More often than not, trying to self-rescue only makes the situation worse, says Bennett.
“Once you start moving you are subjecting yourself to injury, fatigue, and dehydration,” he said. “So in most cases, if you can, it’s better to stay put.”
Going mobile also elevates your chance of missing a rescue team that comes through your area; if they clear the area and don’t find you, they probably will not be back. There are some circumstances in which your only option is to try to get out yourself. Bennett advises you to travel if:
- Nobody knows where you are. They don’t know where to look for you. Always tell someone or leave a prominent note whenever hiking or camping.
- The environment is dangerous enough that it would be more hazardous to stay where you are.
- You are running out of supplies.
- You see the lights of a house, road, or town during the night and can navigate safely toward them.
Otherwise, it is almost always safer and more successful to stay where you are and hope rescuers pick up your signals.
Be Prepared Gear
Being prepared does not mean you have to overstuff your daypack with enough gear to make it through the apocalypse every time you take a two-mile hike. It does mean you should have some bare essentials to make sure you get out of the woods in one piece. Here is a list of common items to pack in an emergency survival kit, all of which can be packed into a small sack weighing less than a pound:
- Knife (fixed blade is best, but a high quality folding knife will suffice)
- Trash bag (55 gallon, heavy duty)
- Fire starter (waterproof matches, flint and steel, or lighter)
- Fire tinder (WetFire, Vaseline-soaked cotton balls)
- First Aid (Band Aids, ibuprofen, antiseptic, moleskin, QuikClot, gauze, antidiarrheal, adhesive tape)
- Water transporter: You can use the sealable bag that carries the rest of the kit
- Mini flashlight
- Signal Mirror
- Whistle
- Water purification tablets
- Paracord
- Snack (energy bar)
Wilderness Survival Schools
The only way to be truly prepared for a survival situation is to take a wilderness survival course. Here are some options in the region:
SOLO Southeast Bryson City, N.C. solosoutheast.com
Southeast School of Survival Cartersville, Ga. southeastschoolofsurvival.com
Mountain Shepherd Wilderness Survival School Catawba, Va. mountainshepherd.com
Living Earth School Charlottesville, Va. livingearthva.com
Earth Connection School of Wilderness Survival Fredericksburg, Va. earth-connection.com
Landmark Learning Semester Cullowhee, N.C. landmarklearning.org
Medicine Bow Wilderness School Dahlonega, Ga. medicinebow.azurewebsites.net


